Paver Stones: Step-by-Step Installation
By Editorial Team
Updated on April 17, 2026
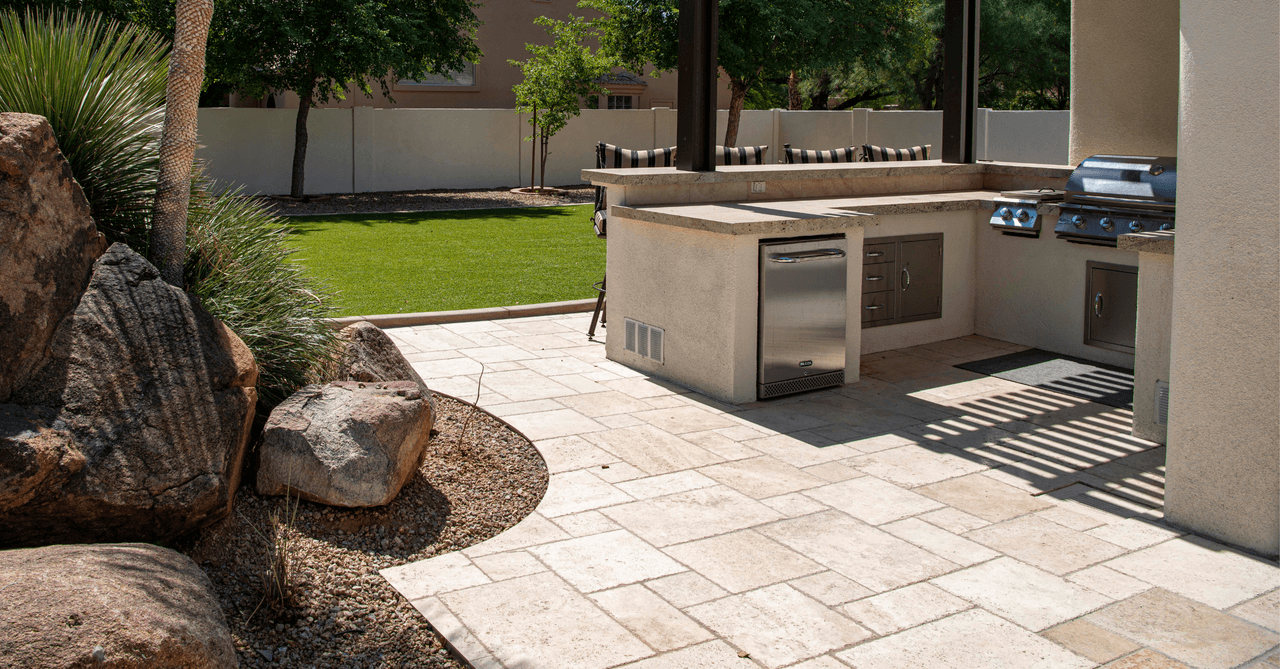
If you want to give your love-starved backyard a little sprucing, there is nothing quite like pavers! Whether you want to create a beautiful patio or have a welcoming walkway for your guests, paving stones are definitely an integral part of many landscaping projects.
However, its installation does require certain precautionary measures to ensure that the spacing between the pavers is adequate and that the surface is properly levelled. Here is everything you need to remember before jumpstarting!
How to Install Paver Stones
Is your driveway paved? Bear in mind that, just like asphalt entrances, there should be a 1/4 inch slope for every square foot, which should always be oriented toward the street and not the house. This is a very important precaution, as it will prevent rainwater or melting snow from accumulating near the foundation.
Before undertaking any work, make sure that no lines (gas or water) are located below the surface that will be excavated. Visit the Info-Excavation website to use their free underground infrastructure locator service.
Step-by-Step Paver Stone Installation

Source: Canva
1- Delimit the area to be excavated
To start off, begin by determining the area you plan on adding the pavers. To do so, it is highly recommended to use the string line method, which is both simple and precise. In fact, this method only requires string and wood pegs, which are referred to as “string” and “batter boards.”
Start by placing the pieces of wood at the four corners of the area to be paved. Next, take the string and stretch it from one post to the other to mark out the area that will eventually be paved. Then, take a can of spray paint and reproduce the shape created with the string on the ground. To ensure the quality of your work, check that the painted corners are at perfect right angles.
In order to be accurate, mark a spot 3 feet from the end of the string. Do the same on the other side, but this time at a distance of 4 feet. Then, use a tape measure to connect the two points. If your angles are square, the distance between these two points should be 5 feet.
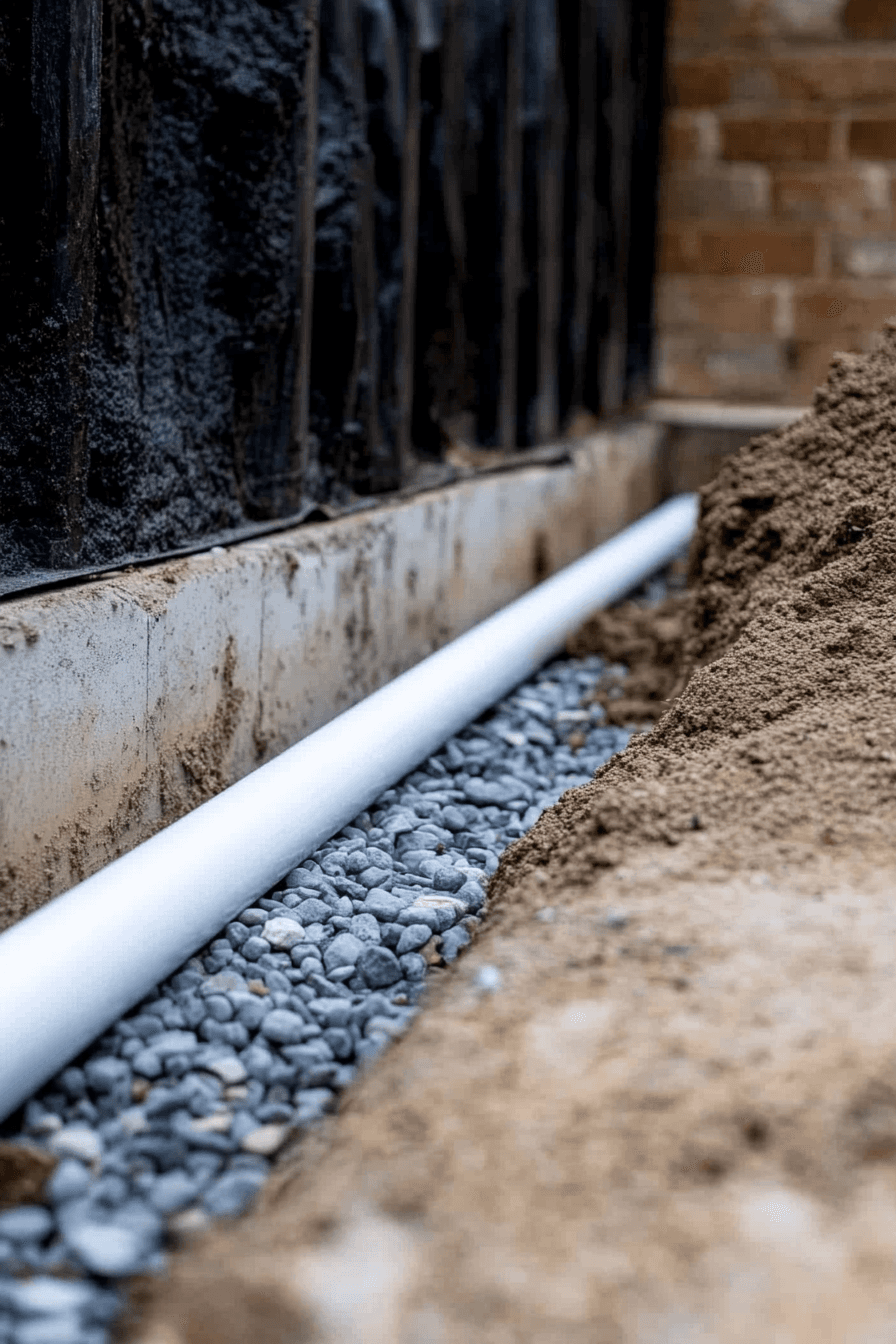
2- Excavation
Now comes the time to excavate! First, you may want to install a border around your paving stones. While the width of the border may vary depending on the overall design, it is best to have a 12-inch wide border.
As for the depth of the excavated area, it should be between 10 and 16 inches. This will ultimately depend on the type of soil you are working with (sandy or clay) and the future purpose of the paving stone surface.
As a reference, note that a concrete sand base of about 5/8 inches or an inch (can be a little more) is usually required in addition to the gravel bed (0-3/4") of 4 inches thick. To ensure that the paving stones are level with the ground, determine the height of the pavers and add the depth of the base (thickness of the base and the layer of concrete sand) to this measurement. Note that using stone screening instead of concrete sand is a possibility.
3- Pour the foundation

Source: Canva
Before proceeding with your project, make sure the slope (if any) is indeed ¼ inch per square foot. If necessary, make adjustments. Usually, it is suggested to install a geomembrane before laying the first layer of gravel. The membrane is to prevent the gravel from sinking into the soil. If you choose to lay a geotextile membrane, ensure that you leave at least 12 inches of the geotextile fabric overhanging the gravel on both sides.
Prior to installing your pavers, level the bottom with a rake. Next, spread a 2-inch layer of gravel and press it down with a vibrating plate. Repeat this step a second time. As a result, the height might not be 4 inches, so be sure to add a little more gravel and compact it again until you get exactly that perfect height.
Once the gravel layer has been laid, it is best to place paving stone strips (plastic edge strips) on one side of the curb. Note that the strip must be nailed into the ground to secure it in place. Also, should there not be a curb on either side of the paved surface, the plastic strips will need to be installed.
Now, spread between 5/8 to an inch of concrete sand (or stone screening) and level the ground with a rake. Before laying your pavers, use a screed to perfectly smooth the ground. This is a 2 x 4 level, with a straight edge, equal in length to the width of the excavated area, which you will then slide along the slope. You will need the help of another person for this step. Feel free to repeat this step several times to ensure that the surface is perfectly smooth.
4- Lay the pavers
You can then start laying your pavers, all the while taking into account the plastic strip nailed into the ground. Note that at this stage, the last section to be laid should not be edged. If possible, avoid walking on the base, otherwise, you will have to smooth everything out again before laying the pavers.
Now, in order to lay your pavers in a straight line, use perpendicular guidelines along the edges of the section to be covered. Place wooden pegs on either side of the surface and pull a string from one end to the other, then do the same thing a little further up (the 4 pegs will form a rectangle).
Start by laying the pavers in the front row, working your way up the left edge, and alternating a full paver with a half paver. Lay full pavers until you get to the other end where you will lay half pavers, which will have to be trimmed beforehand. It is suggested that there be a 1/8-inch gap in between every paver.
5- Fill in the gaps with polymer sand
For your pavers to stay in place and to prevent weeds from growing in between the gaps, fill out the joints with some polymer sand. Just how much sand do you need? To have sufficient sand to complete your project, plan on around 11kg of sand per 30-35 square foot section. The price is located between $20 and $30 for a bag of 15 to 30kg of polymeric sand for paver joints.
Spread the polymer sand over the surface with a wide broom, then use a heavy-duty vibratory plate to pack the paved surface. If the gaps are not completely filled (they most likely will be), repeat the same process a second time. And, remember to run the vibrating plate over the surface one last time.
Now, make sure that the dirt from the sand covering the paving stone is completely cleaned off. To do this, use a leaf blower. Once this step is completed, use a garden hose to wet the surface for about 30 seconds, starting at the bottom.
Be sure to water it a second time, then use a leaf blower to remove any small pockets of water remaining. Finally, avoid walking on the surface for at least 24 hours and do not wash your pavers for the next 30 days to allow the polymer sand to thoroughly dry.
Few Precautionary Measures When Laying Pavers

Source: Canva
Feel free to repeatedly check that your pavers are properly aligned. Should you notice any misalignments, use a screwdriver to fix the pavers. In order to get a perfect final result, the very last row of pavers should be on the edge of the strip or the section intended as the border. To have an elegant final result, mix pavers from several different packages. That way, you will avoid having sections of varying colours on the overall surface.
It is recommended to occasionally walk on the pavers in order to firmly set them into position instead of walking directly on the laying base.
As a final tip, you should be very careful when cutting the half-pavers. Meticulously measure them so that they are aligned with the pavers in the upper row. To cut your pavers, you can rent an electric concrete saw.
If you need tips on how to clean your paving stones, check out this article!
Get 3 quotes for your landscaping project
RenoQuotes.com can help you get quotes for your paving stone project. If you submit your project to us, we’ll put you in contact with top-rated contractors. Fill in the form on the homepage (it only takes a few minutes), and you will receive quotes from companies that are specialized in home renovations.
Dial 1-844 828-1588 to speak with one of our customer service representatives.
Looking for something else?
Related articles
The latest industry news, interviews, technologies, and resources.

Editorial Team
•08 Nov 2023
When it comes to the ins and outs of owning a home, the roof may be last on the list of things we put time and attention into. Of course, the roof is a fundamental aspect of any well-maintained home, and its longevity will greatly affect the life of your house overall. Ventilation is a key part of maintaining a roof, so if you hadn’t considered roof vents before this moment, now is as good a time as any.

Editorial Team
•01 Nov 2024
Have you ever received an impromptu visit from a door-to-door heat pump salesperson? In recent years, itinerant heat pump sellers have travelled throughout Canada and it goes without saying that their reputation has preceded them.
Cynthia Pigeon
•01 Jun 2026
In Quebec, the foundation of a single-family home is exposed to extreme climatic and geological pressures. Between abundant rainfall, snowmelt, and changing soil composition, the drainage system plays an essential role in protecting the home against moisture. When the foundation drain, commonly known as a French drain, begins to clog, water accumulates around the foundation footings, increasing the risk of water infiltration in the basement.

Amanda Harvey
•08 Nov 2023
Hygge, pronounced phonetically as "hoo-gah," is a concept that originated in Denmark but has made its' way to the renovation and interior design networks of North America. Hygge roughly translates to "coziness," but is often described as a mindset for fostering positivity and togetherness in negative aspects of life; an attempt to enjoy the smallest and most insignificant moments.

Editorial Team
•08 Nov 2023
You may be of the mind that renovation is renovation. When considering the end result, this is the case but when it comes to the process itself, there are many different factors that weigh in. If you’re currently living in a condo and wanting to renovate, you’ll face certain limitations, possibilities and strategies for approaching it. In this article, we’re going to look at a condo kitchen renovation and all of what you should consider when renovating this space. This will help you to avoid unwanted surprises during the process.